If you own a DR Trimmer, it is a good idea to have a working knowledge of the parts and their functions. This knowledge will help you to maintain your trimmer properly and avoid any issues with the engine or other parts that might arise over time.
DR Trimmer Parts Diagram
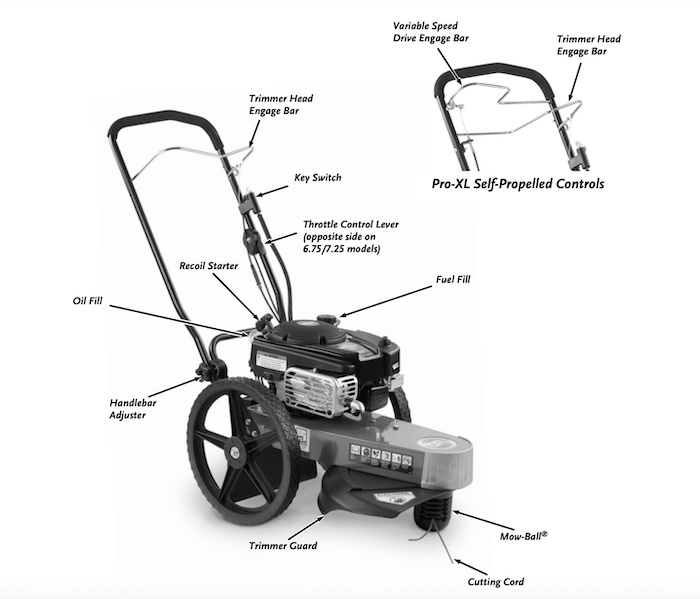
DR Trimmer Parts Explained
Handle
The handle is the part of a trimmer that you hold when using it. It can be made of plastic or metal, and it often attaches to the engine.
The handle helps you control how far down your line goes, and how much pressure you apply to it by moving it up or down on its axis (the same way that a screwdriver moves).
Hopper
The hopper is the part of your trimmer that holds the string, and feeds it to the cutting head. It’s typically made of plastic or metal, but can also be made from other materials, like wood.
Funnel
The funnel is used to fill the hopper. It has two parts: a plastic cap that fits around the shaft of your trimmer, and a semi-transparent plastic tube that comes out of this cap. You’ll want to make sure you don’t overfill it — you can tell when it’s full by looking at how much liquid comes out when you shake it upside down or turn on your trimmer.
If there’s too much liquid in there, then you’ll have problems with clogging up your engine and/or breaking things like blades or other parts of your machine!
Scroll
The scroll is the part of the trimmer that turns the line. Some trimmers have a “tap” to turn the line, and others have buttons or switches on them. Some levers can also be pushed to turn the line.
The most common type of scroll is an automatic model, which will turn itself without needing any help from you! This makes it especially easy for beginners to use because they won’t have to worry about keeping their fingers away from any buttons while they’re trimming their hedges or bushes.
Electrical Box
The electrical box is located on the back side of the trimmer, near where you’ll attach your power cord. It’s a square-shaped box with three holes in it: one for an extension cord, one for a battery pack, and another that allows you to plug in an electrical outlet (if you’re using one).
When you open up the electrical box, there are two wires coming out of it: one red and one black (or white or whatever color your model uses). These wires connect directly to each other and then go into their respective places inside your trimmer’s engine compartment—which we’ll talk about later!
Inside this same area where these wires go into place will be another set of terminals—two per side—that allow us access when connecting up our tools/accessories like hedge clippers or blowers/vacs etc.
Engine
The engine is the heart of your trimmer, and it’s responsible for turning the shaft of the machine. It can be either an electric or gas-powered unit, depending on what you decide to go with.
Both types work similarly in terms of how they power themselves: an electric motor creates electricity while a gas engine uses fuel such as gasoline or natural gas to generate heat and then spin its blades at high speeds, which causes them to cut grass quickly.
Handlebar
The handlebar is the part of your trimmer that you hold to control it. It’s also where you would turn on and off, adjust the throttle and change the cutting height.
String Head
The string head is the part that holds the string. It can be adjusted to control how long of a length of string is dispensed, and it’s usually made of metal or plastic.
The main difference between these two materials is that metal has a more durable build than plastic, making it more suitable for outdoor use. If you want to change out your string head at any time, simply unscrew it and replace with another type if needed!
Throttle control
The throttle control is the part of your trimmer that you use to control how fast it goes. Turning the throttle full on will make your DR trimmer go as fast as it can, but if you don’t have enough power or RPMs (revolutions per minute), then you might get burnt out.
You can adjust how fast your DR trimmer goes by turning this part of it until it feels right for you. If there are no obstructions in front of you and there’s plenty of room around you, then just leave this knob turned all the way up!
Cutting Head
The cutting head is the part of a trimmer that actually cuts the grass. It’s usually adjustable, so you can adjust its height and direction to your liking. You may also be able to adjust its angle as well, depending on what kind of grass you’re trying to cut.
Pro-Style Straight Shaft
The pro-style straight shaft is the most common type of trimmer shaft. It’s also the easiest to use, as it has no curve or angle to it. This type of trimmer can be used by anyone without any problems because there are no parts that can break off and make it difficult to use the tool.
Pro-style straight shanks are more durable than curved ones because they don’t bend as easily under pressure from branches or weeds being trimmed around them; this means less stress on your body when using this type of trimmer!
Flex-Cable Drive System
The flex-cable drive system is a mechanical system that transmits power from the engine to the cutting head. It consists of a flexible cable that connects the engine to the cutting head. The flex-cable drive system uses gears and pulleys to transfer torque from your compressor unit (which powers up when you start your trimmer) to an extension shaft, which drives your trimmer head via belt or direct drive mechanism.
Conclusion
Congratulations on your purchase of a DR Trimmer. We hope that you get many years of use out of it! As we have discussed in this article, there are many different components and parts to consider when purchasing a trimmer, but they should not deter you from making an informed decision.
The most important part is knowing what works best for your needs and budget. If you decide to purchase one yourself in the future, be sure that you know what each part does before buying so there isn’t any confusion later on down the road!


