An ice maker allows you to produce a significant amount of ice in the privacy and convenience of your own home. Because of this, you won’t have to go out and buy ice in advance for the dinner parties and other events you organize in your home.
LG produces these ice makers, and as expected, LG’s products are among the best in stability, functionality, and durability. Although not too pricey, they are worth every penny paid for them.
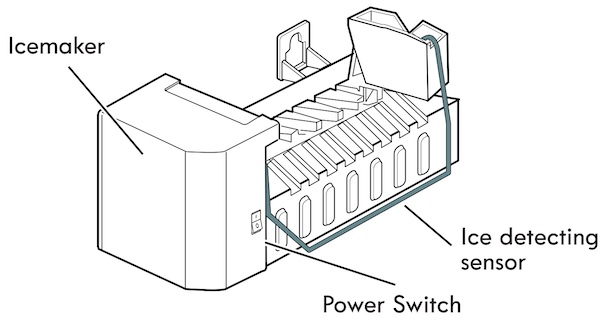
LG Ice Maker Parts Diagram
In this article, we will review the LG ice maker diagram and explain the uses of the different parts of the ice maker. Keep reading.
LG Ice Maker Parts Explained in Detail
Ice Maker Assembly
The ice maker component produces a refrigerator’s ice. The water inflow valve supplies the ice maker with water, which freezes until ice cubes form. When the water has frozen, the cubes will pop out of the mold and into the ice bucket. As long as there is still room in the ice bucket, the ice maker will keep making ice.
Water Tube Kit
Your refrigerator’s water line is composed of plastic and runs from the water valve to the back of the appliance. The tube measures 72 inches in length, has a diameter of 1/4 inch and has enough for 2 inserts.
You may need to trim this tube down to size if it is significantly longer than the original tube. The ice maker and water cooler get their water supply from the same line. You may need to replace this tube kit if the ice maker is not receiving water, the refrigerator is leaking, or the ice and water dispensers are not dispensing as they should.
Pump
To produce ice that can later be broken up into cubes by independent ice makers, the recirculation pump helps to circulate the water over the evaporator.
Condenser Fan Motor
In frost-free freezers that have a condenser coil, this fan motor is required to be utilized. This fan, responsible for cooling the compressor and condenser coils, turns on whenever the compressor does, and it does so by circulating air through the refrigerator grille. This fan motor also contributes to the evaporation of any extra water that may be present in the drain pan.
Thermistor
The bin thermostat on your solitary ice maker must be replaced if it produces excessive ice, little ice, or none. This component will determine whether more ice should be produced or whether it should cease producing ice altogether based on the amount of ice that is currently stored in the bin. Using an ohm meter, you can determine whether or not the thermostat has continuity. This component is created from several materials, including metal and plastic, and it is white.
Door Light Switch
The control panel part of your refrigerator is where you’ll find the light switch for the white door. When you open the door, the light will automatically switch on. If the light does not turn on when the door is opened, the contacts in the switch may be burnt out. If this is the case, the switch will need to be replaced.
Replacement Ice Maker
This is a replacement ice maker assembly. The ice maker receives water from the water inlet valve and will freeze until ice cubes are formed. Once the frozen water is in, the cubes will be ejected from the mold into the ice bucket. The ice maker will continue until the ice bucket has reached its limit. If your ice maker is not making ice, you may need to replace this part.
The Ice Machine Compressor
The compressor is where an ice machine works to heat and pressurize refrigerant. This is a crucial step in preparing the refrigerant for rapid expansion later.
Once in this state, the vapor needs to convert to a high-pressure liquid before it passes through the expansion valve.
The Ice Machine Condenser
The condenser in an ice maker is responsible for lowering the temperature of the refrigerant so that it can condense back into a liquid.
The condenser of an ice maker is a set of metal tubes that work together to cool the ice. By transferring heat away from the refrigerant as it moves through the metal coils, the system can reduce the temperature of the fluid.
The final step in the cooling process is performed by the ice machine, which does this by either blowing air over the hot coils (in water-cooled ice machines) or spraying water over them. Away from the device, the heat is dissipated into the air or water. As the refrigerant cools, it changes from high-pressure vapor to high-pressure liquid.
The Expansion Valve
The thermostatic expansion valve, often known as a TXV, is responsible for releasing the pressure that is contained within the refrigerant by the use of rapid expansion.
Ice makers utilize a technique known as adiabatic cooling to create a quantity of ice successfully. Because of the sudden pressure drop, a substance subjected to a very high-pressure level will rapidly cool off as it decompresses. When you continue to press down on the trigger, the pressured air you use to clean your keyboard will eventually get chilly for the same reason. As the air escapes, the pressure inside the can drops, which in turn causes the liquid inside the can to become less hot.
In the process of creating ice, the rapid expansion transforms the refrigerant from a liquid that is high in temperature and high in pressure into a liquid that is low in temperature and low in pressure.
The Ice Machine Evaporator
An ice cube is formed when water is allowed to freeze inside an evaporator. When the low-pressure liquid reaches the evaporator, the heat from the water transfers into the refrigerant via the evaporator plate; this happens once the liquid reaches the evaporator.
When water passes through an evaporator, it becomes increasingly colder until it is on the verge of freezing. The water eventually freezes into an ice cube as time passes.
After the entire cube has been frozen, the ice maker will begin the harvest cycle to collect the ice so it can be used. Warming the evaporator in the ice machine with either hot gas or water at normal temperature causes the ice to melt and drain into the industrial ice bin below.


