We all love to have a chilled drink in the middle of a hot day. If you have a guest, you might want to serve them some whiskey, and whiskey is always better with some ice in it.
Ice cubes are also crucial in other regards. For example, people often buy ice packs from pharmacies and grocery stores to help with injuries and swelling or other funny tasks like reheating rice or removing gum from clothing.
Some people buy portable ice makers to help with their ice needs, but if you have an excellent Samsung refrigerator with an automatic ice maker, you have more than enough. This guide will go through the ice maker in a typical Samsung refrigerator, looking at its parts and how it works.
There might be some slight differences, but many of the things in this guide will help you understand your Samsung Auto Ice Maker better.
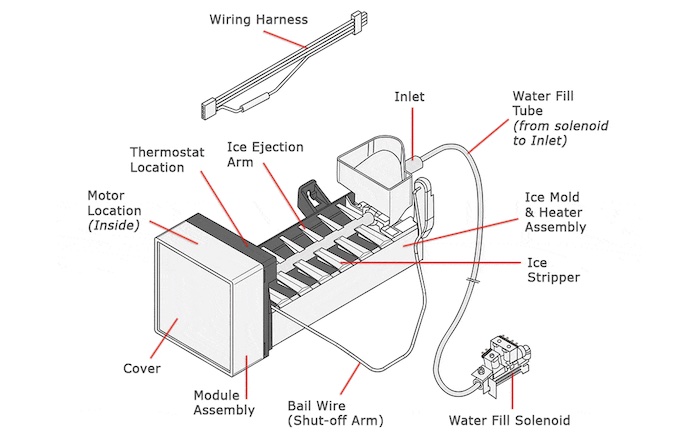
Samsung Ice Maker Parts Diagram
How the Samsung Ice Maker Works
Before we look at the different parts of the ice maker, let us understand how the ice maker works. Ice makers generally require three things to function: steady water supply, low temperature, and Voltage.
First, Samsung refrigerator ice makers require an operating voltage of at least 120 Volts of alternating current. However, some countries use 220 Volts, so you may have to ask questions at the showroom to know if it’s okay to use.
Next, the ice maker requires a steady water supply. You can get this by connecting your refrigerator to your home’s cold water line. This cold water line should be connected to the fridge’s inlet valve and supply water at pressures between 20 and 120 pounds per square inch (psi).
Finally, the temperature required for your ice maker to produce ice is 0°F (-18°C). Of course, it could be lower, but it should not be higher than that value.
To produce ice, the ice maker must receive water from the water line. The water line inside the refrigerator is connected to a water filter that cleans the water before it goes to the ice maker or water dispenser.
The water inlet valve is controlled by a thermostat that tells it to send water into the tray in the ice maker. The valve shuts off when it sends enough water, and the ice-making process begins. The ice maker freezes the water at 0°F or lower until it turns into ice.
When the water is frozen into ice, a heating element underneath the ice mold warms the cubes a little so that they break off the mold. A small motor then turns the ejector arm, so the ice blocks fall off the tray, down a chute, and into the ice collector bin.
The process repeats itself continuously until the ice collector bin is full or you turn off the ice maker.
The Different Parts of a Samsung Ice Maker
Water inlet valve: The water inlet valve controls the flow of water from your home water line to the ice maker. It is controlled by a solenoid and receives signals from a thermostat within the ice maker. It comes on at the beginning of the ice-making cycle and goes off when the ice mold is filled with water.
Water inlet tube: The water inlet tube carries water from the water inlet valve to the ice mold of the ice maker.
Ice mold: This is where the creation of ice blocks takes place. When water from your home water line comes in, the ice mold holds the water and forms ice blocks during the freezing process.
Thermostat: The thermostat’s job is to control the temperature within the ice maker. It monitors the temperature of the ice mold. If it senses that the ice mold has reached a very low temperature (meaning ice blocks have been created), it sends a signal to the motor controlling the ejector arms to eject the blocks. It also sends signals to the water inlet valve to fill the ice maker with water.
Heating element: The heating element is located just below the ice mold. Its job is to warm the ice mold briefly so that the ice blocks can be ejected from the mold.
Ice Stripper: This part is located within the ice mold. It helps the ice ejector arm remove ice blocks from the ice mold.
Ice Ejection Arm: The ice ejection arm is controlled by an electric motor and is used to eject ice blocks from the ice maker after an ice-making cycle is complete.
Ice collection bin: The Ice collection bin stores ice blocks from an ice-making cycle. It can hold a large amount of ice from different cycles, but when it gets full, all ice-making cycles stop until you collect all the ice within it.
Shut-off Arm: The shut-off arm can be controlled manually and automatically. It acts as an on/off switch for the ice maker. During each ice-making cycle, the arm goes up, and comes down after the ice has been transferred to the collector bin. When the collector bin gets full of ice, it pushes the arm up, which shuts down the ice-making process. You can raise this arm yourself if you don’t want any more ice production.


