LG Front load washers have become a popular option for consumers who appreciate the innovative features of the newer washing machines.
Here, we will show you the parts of the LG Front load washer diagram, which will reveal to you every component that makes up the product. Read on as we go into details on how these different components work.
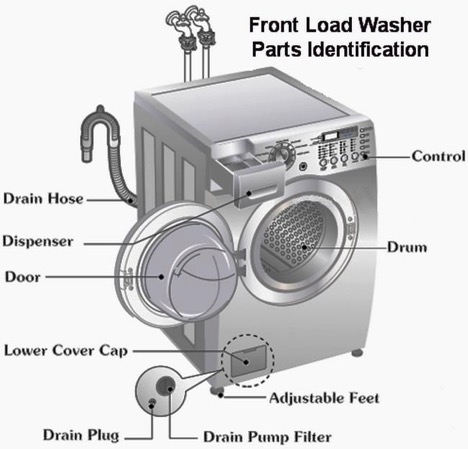
LG Front Load Washer Parts Diagram
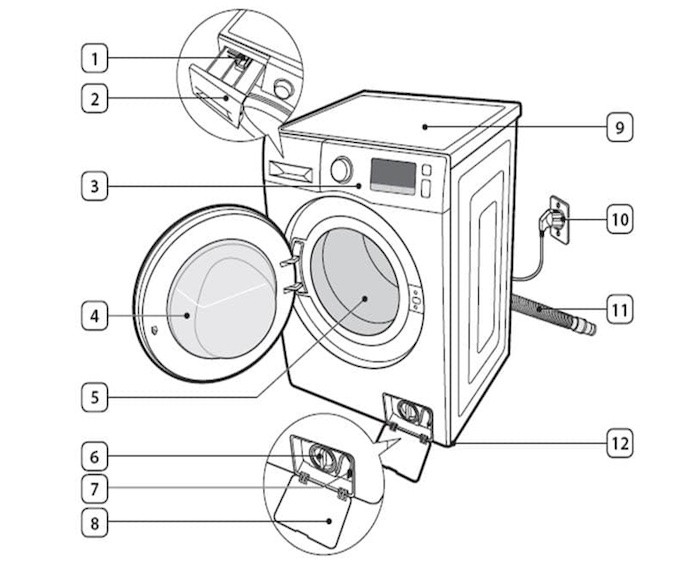
- Release lever
- Detergent drawer
- Control panel
- Door
- Drum
- Debris filter
- Emergency drain tube
- Filter cover
- Worktop
- Power plug
- Drain hose
- Leveling feet
LG Front Load Washer Parts (as Seen on the Diagrams)
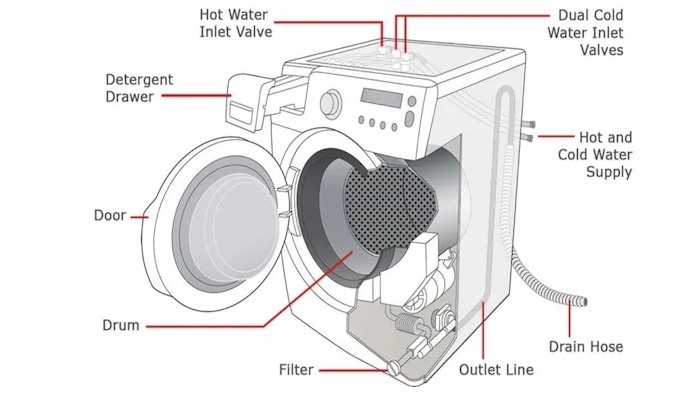
1. Hot water inlet Valves
The inlet valve is often located behind the washer. Its main function is to control water flow into your washing machine. As a gatekeeper, the inlet valve only opens to let water into the tub in response to specific electrical signals from the washing machine. The inlet valve has two hose attachment points: one for the cold water supply hose and one for the hot water supply hose.
2. Detergent Drawer
There are three separate sections in this washing machine drawer, and they are all used for different things.
Whether doing a “pre-wash” or “primary wash,” you’ll put your detergent in one of the two larger compartments and your fabric softener in the smaller one.
a. The pre-wash compartment
When performing a “pre-wash” cycle, place some detergent in the pre-wash compartment. A “pre-wash” cycle is a wash that takes place before your clothing enters its “main wash” cycle, and it aids in getting rid of stubborn dirt from your clothing.
When you intend to clean any additional unclean clothing completely, this drawer needs to be filled.
If you choose a “pre-wash” cycle but don’t fill up this drawer, your clothes will go through a standard “main wash” cycle and might not be as clean as you’d want.
b. The ‘main wash’ compartment
The primary wash compartment is the slot that you will utilize the vast majority of the time while you are washing your garments. When you wish to clean your garments, you put the detergent in this compartment before starting the washing machine.
Before you put the detergent in the slot, you need to think about what you intend to wash and read the instructions on the back of the detergent packet to determine how much detergent to put in the slot.
This compartment is designed to hold either a powder or a liquid detergent. You should, however, place the tablet or capsule directly into the drum of the washing machine if you intend to use a tablet or capsule form of detergent.
c. The ‘fabric softener’ compartment
The fabric softener slot will be the tiniest of the drawers in your washing machine. Clothes can be made softer in the washing machine with fabric softeners. Even though it’s not required, using a fabric softener will make your clothes feel better, and if you choose a scented one, they’ll also smell wonderful.
Don’t stuff too much into this drawer. In addition, if you are unsure how much softener to put in, either follow the instructions on the bottle or check the max line in the compartment; don’t go over it.
3. Drums
The interior of a washing machine consists of a pair of drums: an inner drum and an outer drum. The first component maintains the inner tub throughout the spin and rinses cycles, while the second component is responsible for holding your laundry while the cycle is in progress.
4. Water Inlet Control Valve
When you load your clothes into the washing machine, this component of the machine, which is also known as the solenoid valve, opens up automatically. It is responsible for feeding material into the machine’s primary drum on the inside. When you start a load, the amount of water that is utilized is determined by the setting that you select.
5. Washing Machine Motor
You may probably guess that the engine is one of the most crucial components of a washing machine. It generates the necessary rotary motion for washing and rinsing laundry in a washing machine.
When you begin a cycle, you will be given the option to select the pace determined by the fabric of the garments you are washing. For instance, a setting designed for heavily soiled clothes will have a higher level of agitation than a setting designed for delicates.
6. Printed Circuit Board (PCB)
This is the location of all of the electrical components and circuits that are contained within a washing machine. One may refer to this component as the “brain” of the washer. When you select the sort of cycle you want to use, the Printed Circuit Board (PCB) is the one that takes in the information, relays it to the various components, and makes sure that everything works as it should.
7. Agitator
During the cycle of the washing machine, an agitator located inside the drum will continuously revolve, assisting in the loosening of dirt from your garments as they rub against one another in soapy water.
8. Debris Filter
The washing machine has a filter that removes undesirable items, such as dirt and lint, that could otherwise accumulate in the washer. The detergent, pieces of dirt, and soil that are on your garments are collected by the filter.
9. Drain hose
The drain hose, along with two other hoses that are used for the provision of cold and hot water, may typically be located on the rear of the washing machine. The drain hose is responsible for carrying wastewater away from the device, while the hot and cold water supply hoses are responsible for bringing clean water into the machine.
10. Power Plug
The washing machine can be connected to an electrical outlet via the power plugs. The current flow activates the washing machine through the wire, which is supplied by the power plug.


