Portable ice makers are popular among people with different ice needs in various locations, like the office, poolside, boats, and RVs. You might also find it helpful if you are tired of the tiny ice makers in your freezers or don’t like using ice trays.
Frigidaire ice makers like the stainless steel EFIC117 26 LBS ice machine are some of the best today. In this article, we will look at all the parts of the ice machine and how they work together to produce small and large ice blocks for your use.
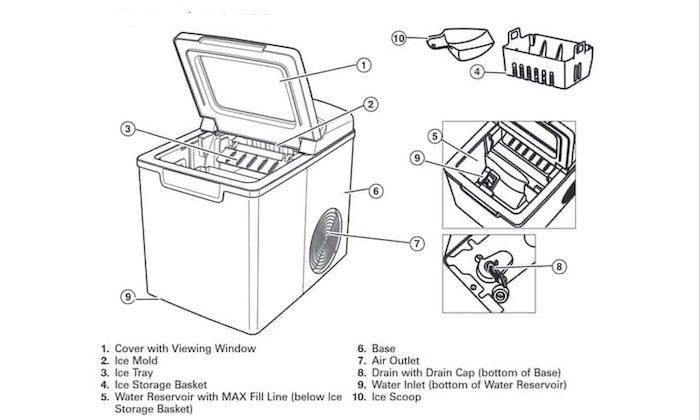
Frigidaire Ice Maker Parts Diagram
Frigidaire Ice Maker Parts (as Seen on the Diagram)
The Cover
The cover or lid is usually found at the topmost part of the ice maker. It gives you access to the other parts of the machine and protects the internal parts from foreign objects like dust, hair, etc.
The cover also has a viewing window, a transparent part at the top that allows you to view everything inside the machine. This way, you can quickly stop the machine if you don’t like the way it is operating or if you sense a potential hazard within.
Control Panel
The control panel is the name given to the control buttons and indicators at the top of the fridge that lets you monitor the entire process from outside. There are different buttons and light indicators on the control panel, all serving different purposes. Let’s go through them:
Power Indicator Light: This light shows that the machine is on. If this light doesn’t come on, check your connection to the wall socket before checking to confirm that the wire and plug are okay.
“Add Water” Indicator Light: This indicator light comes on when the water level in the ice machine has gone below a certain threshold, i.e., the water is too low. Stop the machine, open the lid and add sufficient water.
“Ice Full” Indicator Light: This indicator light comes on when the ice basket is filled with ice. You should turn off the machine and remove ice from the ice bucket.
On/Off Button: This is the first of two buttons on the control panel. The function of this button is to start and end an ice-making cycle.
“S” Small Size Indicator Light: Depending on your need, you may prefer small- or large-sized ice blocks. This indicator light comes on when you have selected the small block option using the “Select” button.
“L” Large Size Indicator Light: The large size indicator comes on when you have selected the large block option using the “Select” button
Select Button: You can use the select button to choose the size of your ice cube. Pressing the button toggles the light between both options.
Ice Basket
When the machine is done with the ice-making process, the ice basket collects all the ice and keeps them until you take them out. The ice basket cannot hold too much ice. Once it reaches its full capacity, the “Ice Full” indicator light will come on, and you’ll have to take out the ice in the ice basket before you can continue.
Water Reservoir
The water reservoir is just below the ice bucket. As the name implies, this is the compartment that stores water for ice-making. The pump takes the water up to the ice mold, where the ice is made.
In some other ice machines, the water reservoir is called the sump.
Ice Mold
The job of the ice mold is to mold the ice. There are multiple ice molds in every Frigidaire ice maker, often 6 or more cylindrical metals. The water forms around the metal, and freezing lasts for a few minutes until the ice molds create ice blocks.
After the ice blocks are created, they are transferred from the ice molds to the ice basket using the ice shovel.
Ice Scoop
When the ice basket is filled with ice, you need a scoop to pack all the ice from the machine and into your container. The ice scoop is an added accessory to help with this. It is often made of plastic.
Drain Plug
The drain plug can be found at the bottom of the water reservoir. You can use it to drain excess water from the water reservoir. Ensure it is plugged in before pouring water into the reservoir, and ensure that you are on a drain or sink before you remove the plug to avoid pouring water all over your apartment.
Air outlet
Like other machines, a Frigidaire ice maker has an intricate wiring design that allows all the parts to function. The refrigeration process is demanding, and it requires exchanging the temperature of the water with the refrigerant multiple times.
The machine takes the heat from the water and releases it into the environment using air vents or outlets. Without this part, the ice machine would collapse in no time.


