We have dryers all over our house, but not all dryers come with the same features. We must admit that we liked the Kenmore model 110 when it came time to replace our dryer. It has a nice sleek design and a large capacity, making it a great dryer. It also has excellent features and important controls to help you dry clothes successfully and comfortably. So we strongly recommend it for any dryer that needs to be replaced.
You might not be familiar with how your dryer operates, but it ensures that laundry day goes well and that your clothes are ready to wear. Learn more about the components of your dryer to get to know it from top to bottom. You may learn about parts, their locations, and maintenance advice from this handbook.
For proper dryer operation, a mix of heat, air, and drum rotation is used by all dryers. You might be able to maintain your dryer’s efficiency if you understand it.
Kenmore Dryer Model 110 Parts Diagrams
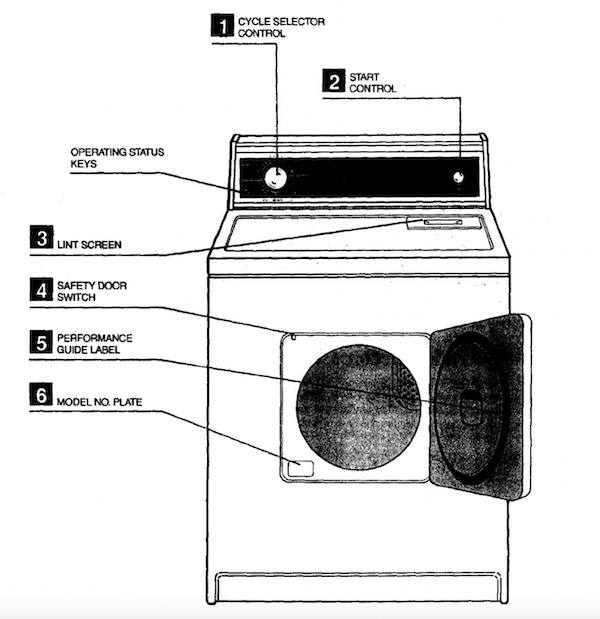
Kenmore Dryer Model 110 Parts and Functions
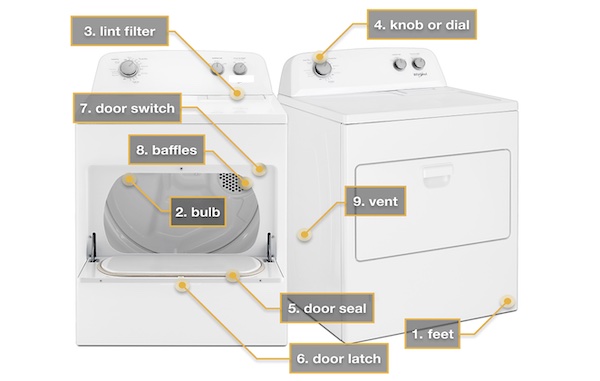
1. Dryer feet
The feet of the dryer is located on the underside of the device. They contribute to the dryer being held securely in position. During the drying cycle, if the dryer is vibrating and off-balance, it is possible that the feet will not level or work properly.
2. Dryer light bulb
When you open the door to the dryer, you will see that a light bulb has automatically turned on. This lamp illuminates the interior of the dryer. If the bulb has burned out, it is typically not difficult to replace it with a new one.
3. Dryer lint filter
The location of the lint filter on a dryer can either be on the machine’s exterior or on the door opening on the interior, depending on the model. As it moves through the dryer vent, it gathers lint and other debris in its path. Each time you run the dryer, you need to remember to clean the lint filter. If, after running a cycle, your garments are not completely dry, you should rewash them with soap and water.
4. Dryer knob or dial
The time can be set using either the knob or the dial that is found on the exterior of the dryer. If you cannot spin it, or if it turns but does not respond to your actions, it may be time to replace the knob or dial.
5. Dryer door seal
The gap between the dryer drum and the door is sealed off by the dryer door seal, which prevents air and things from falling out of the drum from escaping. It’s possible that the seal on the dryer door needs to be replaced if it doesn’t shut properly.
6. Dryer door latch
During the drying cycle, the dryer door will remain closed thanks to the latch. You won’t be able to utilize the dry cycle if the door of the dryer won’t close or if it keeps opening on its own.
Shop Latch for the Whirlpool® dryer door
7. Dryer door switch
The dryer door switch, which may be found at the entrance of the dryer door, disables the dryer function whenever the door is left slightly ajar. There could be a problem with the switch if the clothes dryer does not begin operating when the door is shut.
8. Dryer baffles
The baffles used in dryers can be found inside the dryer’s drum. They encourage air passage to help tumble the clothes while drying in the dryer. A replacement component will be required if a baffle is displaced or missing entirely.
9. Dryer vent
The exhaust vent located on the rear of the dryer is responsible for venting the hot, moist air produced by the dryer to the exterior of the building. It is recommended that you clean the dryer vent at least once every two years, but the frequency of cleaning should be increased depending on the length of the dryer vent and the number of bends in it.
10. Dryer blower
The fan in the dryer helps to circulate the air by first drawing in hot, dry air and then drawing out hot, moist air via the vent. It can be found in the vicinity of the base of the dryer cabinet. If you hear high-pitched noises when using it, notice loud vibrations, or find that drying takes a longer amount of time, these could be signals that your blower needs to be replaced.
11. Dryer thermal fuse
Your dryer won’t overheat thanks to the dryer thermal fuse’s safety features. The thermal fuse will blow and turn off the electricity to the motor if it overheats. A blown a fuse prevents the dryer from heating and prevents it from being reset.
12. Dryer sensor and thermistor
The dryer temperature sensor or sensors track the cycle temperature to dry your laundry and are often found on the blower housing. It could be necessary to clean or replace the moisture sensor strip if your clothes aren’t drying completely during an auto cycle.
14. Dryer drive belt
The drive belt encircles the dryer drum’s exterior. It rotates the drum throughout the drying cycle by being attached to the drive motor. It may be time for a new drive belt if the drum doesn’t rotate the motor yet is audible.
15. Dryer drive motor
The drive motor, housed in the dryer’s back panel, powers the drive belt and pulley wheel to turn the drum. The dryer’s motor may be broken if it refuses to start, makes a lot of noise, or stops in the middle of a cycle.
16. Dryer drum slide, glide, or pad
The drum is supported while it revolves around drum slides, pads, or both, which are located inside the dryer cabinet. When it’s time to replace the slides, the dryer will make a loud noise. All slides might need to be replaced because they usually lose their quality simultaneously.
17. Dryer drum roller
The drum rollers are located next to the drum in the back panel. Throughout a drying cycle, they maintain the drum’s position. You might need to replace the drum rollers if the dryer continuously creates loud rumbling noises while in operation. Some drum rollers are known for being loud at the beginning of a cycle before becoming quieter as they “warm up.” Consider replacing all the rollers at once because they often wear out simultaneously.
18. Dryer circuit board and timer
The dryer’s electronic control board, housed in the back panel, controls parameters like time, temperature, and function. Power is directed to the motor and other parts through it. The control board could be the issue if all other dryer parts operate normally, but the dryer still won’t run.
19. Dryer heating element
The air that is cycled by the blower in the dryer drum is heated by a heating element, which might be a coil or wire, in electric dryers. Either the dryer drum or the appliance’s back panel contains it. The issue can be caused by the dryer not heating up throughout the cycle.


